Thursday, August 27, 2009

Bow Tutorial - By Anna

Almost everyday at the Essential Packaging Store, we get asked,
"How do you tie a nice bow?"
Well, today I'm going to do a tutorial on how to tie a bow! There are many different kinds of bows you can make but today I'm going to do a very simple one that I like to call The Cheater Bow. I call it this because technically we're not tying the ribbon into a bow. Follow this tutorial and see how really easy it is to tie a bow!

Start off with a length of ribbon. In this sample I'm using about 18" of single face satin ribbon.
Form the ribbon into a loop that resembles the Breast Cancer ribbons.

Then bring the loop down until it touches the centre where the ribbon crosses itself. You should now be able to see your bow starting to take shape.

Using a small length of tinsel cord, about 8" long, place the tinsel cord vertically down the middle of your bow.

Take the ends of the tinsel cord and tie a loose knot. As you begin to tighten up your tinsel cord knot the centre of your satin ribbon bow will also begin to gather. Be sure to make a double knot with the tinsel cord to secure the bow. Once you've finished the tinsel cord knot you may need to adjust the satin ribbon so that the bow lays properly.

This is a view of your ribbon bow from the back. Note that after I tied the tinsel cord knot I turned the knot to be at the back of the bow. This will allow you to use the remaining cord to attach your bow onto something else.

Now, back to the front of the bow. I trimmed the ends of the bow tails on an angle to give the bow a nice finish.

And there you have it - the perfect Cheater Bow!! Once you have mastered this bow try experimenting- use different types of ribbon, including wired; layer two or three small bows, in different colours and textures, together to create one amazing bow!

Well, I hope this tutorial has helped take the mystery out of bow tying! Please let me know if you found this tutorial helpful or if you have any further questions, I'd love to hear from you! Until the next tutorial, happy bow tying!

Anna

Tuesday, August 25, 2009

Wedding Wednesdays - Paper Bag Favours!


Hi again! Time for another Wedding Wednesday blog entry. This week I thought I would borrow an idea from our current August newsletter only this time, we're using these little brown bags as wedding, shower or party favours. They're quick, easy and inexpensive to make and best of all, they can be personalized any way that you wish.


For this sample, we used our little 1/2lb brown paper bags (they measure 3" wide x 5 1/8" tall with a 1 3/4" side gusset or pleat). They're a great size for wrapped candies or chocolates! We trimmed the top of the bag with pinking shears just to fancy it up a bit.

We stamped our little saying, in brown ink, on the front of the bags (this particular stamp is from Stampin' Up). Then fill your bags, fold down the top of the bag and punch two holes side by side near the top of the bag. Thread a piece of ribbon through the two holes and tie a shoelace bow on the front. That's it! Easy and really cute, too!

Thanks and we'll see you soon!
Anna

Wednesday, May 20, 2009

Wedding Wednesdays - Out Of Town Guests

Hi everyone - can't believe another week has flown by!
This week for our Wedding Wednesdays post I thought I would feature ways to package hotel room snack packs for out of town guests. Then yesterday we received our shipment of new gable boxes and viola! I had my inspiration!

These new gable boxes (paper shopping bags and wine boxes as well) are available in the Fine Dining green and white pattern and in the gorgeous black Vino Noir pattern.

You can colour co-ordinate your snack packs with your wedding colours or just go with something fresh as we did in these photos. Either way, I'm sure your out of town guests will appreciate having some yummy munchies in their hotel rooms!

Unsure of what to put in your snack packs? Anything would be great but think of non-perishables and easy to eat items that don't require any extra preparation. Beverages like juice or water are a must, while granola bars, apple sauces or dried fruit are great. Just remember some plastic cutlery and napkins!

Wednesday, May 6, 2009

Wedding Wednesdays - Cupcake Boxes!!

Hello! I know I'm a bit tardy with my Wedding Wednesdays post this week; it's almost Thursday! Well, as they say, better late than never!!!

Great news for all the brides (and other customers) who have been asking (and asking, and asking...) for cupcake boxes - we now have them in stock at the Store!!!!! The cupcake boxes are available in singles, fours and sixes.

These white single cupcake boxes have a clear window cutout in the top so you can see your fabulous cupcake inside! We added a little bling accent to the window; it's a nice touch that doesn't interfere with seeing what's inside.


Inside the cupcake box, there is a removable insert that will hold your cupcake straight and ensure that it doesn't tip over.

Adding ribbon around the sides of the cupcake box allows guests to open the lid and eat their yummy treat without disturbing any of the wrapping!

Wednesday, March 25, 2009

Wedding Wednesdays - Tissue Paper Flowers


UPDATE:


Want to learn more about how to make tissue paper flowers?


Take a look at our post How To Make Beautiful Tissue Paper Flowers  HERE 


It's on our new blog A Beautifully Wrapped Life!


Tissue paper flowers are just so easy to make that they're a perfect decoration for any gift or event. With tissue paper available in so many colours, it's easy to match to any decor or theme.

Below are the simple steps to creating these beautiful blooms-


To start, you will need tissue paper sheets that you cut into a rectangle of any desired size. Use a full sheet for very large flowers (for reception decor) or 1/8 of a sheet for small flowers (to be used on favour boxes). Stack 6-8 pieces of tissue. Add more layers for fuller flowers.


Then, accordion fold your tissue paper sheet working from the long sides. Use a ruler or bone folder to crease the folds.


Cinch your folded tissue paper sheet in the centre using a length of tinsel cord to tie.


You can either chose to leave the ends as they are or you can cut them rounded or pointed for some variation.


Now, gently pull each piece of tissue paper towards the top centre of the flower to create the bloom. Fluff up the finished flower.


Attach your finished flowers onto your gift box, as we did below.


Other projects you can do with your tissue flowers-
Glue a mini flower to a pin for a lapel decoration or string smaller flowers along some ribbon to make a garland. Also, try dipping the edges of the tissue paper in white glue and then into loose glitter to create shimmering flowers for a more glamorous event.

Wednesday, March 11, 2009

Wedding Wednesdays - Cello Bag Favours

Hello and welcome to our newest feature, Wedding Wednesdays!
Every week we will have some wedding tidbit that we hope will enhance your special day.

This week, we thought we would take a look at cello bags - those wonderfully versatile and inexpensive little bags that we sometimes overlook as being "too simple".


With so many different patterns available, it's easy to find a cello bag that suits your wedding theme.


You can even choose from seasonal patterns if your wedding happens to be near a time such as Valentines'.


To create these elegant favours, simply place your favour item (either boxed or loose) into the cello bag and tie at the top with co-ordinating ribbons. It's that easy!

Sunday, March 1, 2009

Carrot Cone Bags


UPDATE

Want to learn more about how to 
creatively use our packaging products?

Take a look at our new blog,

A Beautifully Wrapped Life here


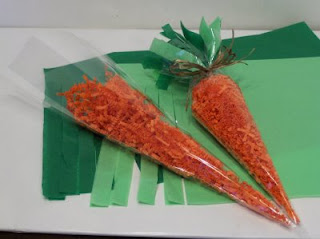
One of the most asked about products in our Store is the cello cone bag! And at this time of year, our cone bags make perfect “carrots” for Easter gift giving. They're easy to make, look great and everyone loves to get one, especially the kids!


First, fill your cone bag with treats (we like to use orange coloured jelly beans).
Secondly, you will need 4 sheets of tissue paper, stacked (in 2 different shades of green), cut into 5” x 5” squares. Make ½” strip cuts at one end making sure to leave about ½” from the other end still attached.
Finally, roll the tissue and tuck into the top of the cone bag so that the “leaves” stick out the top of the bag. Tie with wraphia to keep the contents and the tissue in the bag.
Enjoy! Anna