UPDATED!!
Take a look at our newest giftbasket tutorial on our new blog,A Beautifully Wrapped Life!!
Click here to see the new tutorial
Have you ever wanted to put together one of those beautifully wrapped gift baskets but just didn't know how to wrap it or where to even start? It can be overwhelming especially when we really want it to look amazing, right? Well in today's post, we're going to show you, step by step, how easy it can be wrap up a gift basket!
Step #1 - Your Supplies
a gift box with removable lid, clear cello basket bag (instead of the roll wrap),
newsprint packing paper, some tinsel cord, a pull bow and some colored basket shred.
Step #2 -Your Container
For this gift basket, instead of using a boring wicker basket we will be using one of our 2 piece gift boxes that measures 7"x7"x4". These boxes are quite rigid and not only make great gift basket containers but they're also reusable as storage boxes after. You can either place the lid under the box or behind it.
Step #3 - Your Base
For a good base, we use newsprint packing paper. The newsprint is stiff, inexpensive and helps
to fill the bottom of your container so you use less of the colorful basket shred. The packing
paper also helps to keep heavy things (like jars and bottles) in place so they don't get damaged
and prevents them from sinking down to the bottom of the box (you want to see the products!)
Step #4 - Your Filler
Once you've got your newsprint packing paper in place, sprinkle some colorful basket shred on top.
The color choice is yours but we usually recommend using a complimentary color (that matches
the ribbon or bow) or a neutral color so your products stand out.
Step #5 Your Products
When placing your products in the gift basket, keep in mind a few things:
- How is your basket going to be viewed? Just from the front or all the way around? In our sample gift basket, we decided to make the basket viewed just from the front, which is why we put the lid at the back of the box. You then want to "layer" products smallest to largest, from front to back (this way, small items can lean against the tall items in the back)
- If your gift basket is to be viewed all around, you would put your lid under the box with the taller products in the center and the smaller items around the edge.
Step #6 - Your Basket Bag
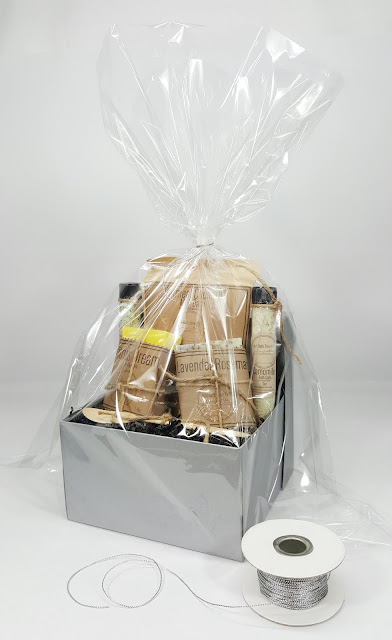
Once you've placed all your products in the box, it's time to put the box into a clear cello basket bag. Though not all baskets or containers will fit into a preformed basket bag, if yours can then use one as they are much easier to use than the traditional cello wrap on a roll. Secure the top of the cello basket bag with a length of tinsel cord. We usually like to tie at the top of your tallest item in the gift basket. This helps keep everything secure inside and the cello wrap looking nice and crisp (not like someone sat on it!!)
Step #7 - Your Corners
You'll notice in the previous photo in Step #6 that the corners of the basket bag are sticking out on the
sides of the box. You MUST tape those under the box! It's the quickest way to make an average
looking basket look amazing! It also helps keep all those products in their place. The last thing you
want to do, after all this effort, is give a gift basket that looks like it's been rolling around in your car trunk!
Step # 8 - Your Bow
Ok now you're almost done, you just need a bow for that finishing touch! The bow is an important
part of the overall presentation of the gift basket so it needs to look good. Above, we've shown
an example of a black pull bow (top photo) which is easy to use especially if you're not good
with tying bows. In the bottom photo, we used a custom printed satin ribbon bow, which is hand tied.
This is a bit trickier to do but looks amazing, especially on corporate or special event gift baskets.
So, hopefully these easy to follow steps will inspire you to try making a beautifully wrapped gift basket soon!
Interested in great projects, new products and special features?
Sign up for The Essential Packaging Newsletter
Shop online at www.essentialpackaging.com
That's all for now but we'll see you soon!
Anna @ Essential Packaging
Sign up for The Essential Packaging Newsletter
Shop online at www.essentialpackaging.com
That's all for now but we'll see you soon!
Anna @ Essential Packaging


