Hello everyone!
I know I'm a few days late in posting this advent calendar but as I like to say (often!) "better late than never!!" So, here are two examples of an advent calendar using our white giftware boxes, giftwrap, ribbon and cardstock. The really great thing about making these advent calendars is that you can customize them for anyone - pink for little girls, blue for boys, hockey theme for big boys or even glittery and blingy for big girls! This first version was created by our Office Manager, Shannon, for her 3 year old niece-
Shannon used our 3" x 3" x 3" white giftware boxes, 25 of them in total, assembled them in five rows of 5 boxes and attached them together with tape. She printed the numbers on white cardstock and then matted them onto pink and lime green cardstock.
The pink and lime green satin bows co-ordinated perfectly with the foil giftwrap Shannon used to wrap around the outside of the boxes.
When assembling the giftboxes, make sure that all the box "tops" are facing the front so you can open them! Shannon chose to have her box tops opening down. This giftbox is an ideal size for any little treasures you may want to give.
Here's a view of the back - these are actually the "bottoms" of the giftboxes, placed on their sides.
This is the second advent calendar sample - this is one that I made for my 3 year old son, Matthew, after I was inspired by the one that Shannon made! I went with the red and blue colour theme for him, his favourite colours!
The only thing a bit different from the sample that Shannon made was that I chose to have my "tops" open upward instead of down like hers. It wasn't so much of a choice as it was a boo-boo that I realized after I glued the first boxes together!! It still worked out in the end.
The advent calendar was fun, quick and easy to make - my version probably took about 2 hours max. to complete and that was mostly due to cutting out the numbers and mats. Matthew has really enjoyed opening his up over the last few days - the little Matchbox firetruck from this morning has been the big hit so far!
Take care and see you soon!
Anna
Wednesday, December 2, 2009
Gift Basket Tutorial - by Antonella
You are going to love our "basket bags".
What is a basket bag - you ask? Keep reading...
With the holidays fast approaching I thought I would post a
step by step tutorial on how to assemble your gift baskets.
The basket bag way...
Step 1. Assemble your supplies:
You will need the following items:
Basket or Tray
Tissue paper and shred
Basket Bag
Ribbon
Tinsel cord
Ornament or other accent
Scissors and tape
Basket Contents
Sprinkle a handful of shred on top of the tissue paper.
The tissue paper will help keep the contents of the basket from shifting.
Arrange your items into the tray.
Nestle them into the tissue securely so they don't shift when it comes time
to transport your gift.
Now all you have to do is simply place the basket
into the basket bag. Yes, it's that simple.
Tuck the corners of the bag under the basket and tape securely.
Pull the basket bag up so it's snug around the tray and not sagging anywhere.
Tie with tinsel cord. Pull hard - it should be tied tightly.
You should not have any space in between the cinched top of the basket
bag and the tallest item in your basket. If you do the bag will begin to sag.
We prefer to use tinsel cord to tie the bags simply because
it's strong and we know it won't break.
Pre-tie your bows as shown in Anna's bow tutorial.
Tie the bows onto the basket bag using the tinsel cord then tie on your accent.
Trim any extra cord.
That's it - you're all done.
Happy Wrapping!
Saturday, November 28, 2009
Holiday Wrapping - Gift Card Holders!
UPDATE:
Want to learn more about how to
creatively use our packaging products?
Take a look at our new blog,
A Beautifully Wrapped Life here
Hi again...
Gift cards are just so popular, especially for Christmas. We get a lot of customers coming in looking for some different ways to wrap them up, besides a plain envelope! Here are a few fab gift card wrapping ideas that we've come up with for this year-
These presentation boxes are so elegant and quick to wrap - just add some ribbon (and accent) and you're done! The black and white patterned box has a pull out insert for your gift card, whereas the white striped one below has a flip up lid (see first photo at the top).
Pillow boxes are perfect for gift cards; you can even include a little yummy treat in there, too! Don't forget to attach an accent to your ribbon as part of the gift.
Even just a simple ribbon bow can make a pillow box very elegant; ideal for a gentleman's gift.
Our hinged tins are a great gift card wrapping option - durable, reusable and chic!
These gift card envelopes are available in several different colours to match any wrapping scheme. We added a fabric pull bow (so easy!!) and snowflake accent to this one.
Last, but certainly not least, are the new Envelopments Envelofolds - these little envelopes are just the right size to tuck into stockings! They're available in several beautiful pearl cardstock colours.
I hope these photos have provided you with some inspiration to try something new for your gift cards this holiday season. If you can, drop by the Store for even more ideas!
Take care,
Anna
Friday, November 20, 2009
New Stuff - Cupcake Inserts!
UPDATE:
Want to learn more about how to
creatively use our packaging products?
Take a look at our new blog,
A Beautifully Wrapped Life here
Hey everyone!
Have you noticed how HUGE the cupcake craze is? If you haven't then you must be hiding under a rock 'cause it's CRAZY! If you're planning on whipping some this holiday season then you may want to check out our newest packaging options for cupcakes-
The Essential Packaging Store now carries a selection of cupcake inserts - pictured above - that can fit into our regular giftware and bakery boxes.
The single cupcake insert fits perfectly into our regular 4" x 4" x 4" giftbox, which is available in white, natural, red, silver or brown.
Just place the insert into the box and viola! your cupcakes have a perfect little presentation box!
Here's a sample of our 12 mini cupcakes insert that fit into our 10" x 10" x 5" cake / bakery box.
The same size bakery box will also accommodate the 6 regular cupcakes insert.
The 12 regular cupcakes insert and 24 mini cupcakes insert both fit into our 10" x 14" x 4" bakery box.
These cupcake inserts and bakery boxes make transportation a breeze and presentation just perfect!
Happy cupcake making!!
Anna
Friday, November 13, 2009
Hi this is Cathy ...
"I have compiled a list of gift wrapping supplies
to help get us all organized for the Christmas season.
Remember presentation is everything.
A simple box with a bright ribbon makes a great impression.
It's the small thoughtful things we do that create beautiful memories.
Have fun with your holiday gift wrapping.
Come in a visit us real soon!"
List of Holiday Gift Wrapping Materials
Putting together a gift wrapping area can save you
lots of time when working on holiday gifts.
Items marked with an * you can purchase
at the Essential Packaging Store
Putting together a gift wrapping area can save you
lots of time when working on holiday gifts.
Items marked with an * you can purchase
Tools:
Scissors *Clear scotch tape * Tape Runner *
Ruler and Tape Measure
Hole Punch *
Gel Pens * (gold, silver, white, black, brown)
Gift Packaging:
Assorted boxes for large & small gifts *
Jewellery boxes*
Boxes for cookies, cupcakes, pies, truffles *
Parchment paper for lining baked goods*
Gift card envelopes & boxes *
Organza bags *
Cone Bags for snowman soup*
Cards & Tags:
Wraphia *
Satin & Sheer Ribbon *
Natural twine *
Curling Ribbon *
Gold & Silver Stretch loops*
Tinsel cord*, Boa Bows*
Satin Stretch Loops *
Decorations:
Embellishments* Christmas ornaments*
Gift Basket Material:
Basket Shred* Gift Basket trays & boxes*
Cello Rolls* clear & patterned for Baskets
Embellishments* Christmas ornaments*
Gift Basket Material:
Basket Shred* Gift Basket trays & boxes*
Cello Rolls* clear & patterned for Baskets
Monday, November 2, 2009
Snowman Soup Tutorial!
UPDATE:
Want to learn more about how to
creatively use our packaging products?
Take a look at our new blog,
A Beautifully Wrapped Life here
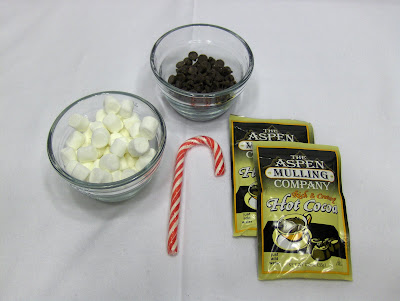
Our Snowman Soup in a cone bag debuted a few years' back but it still remains our most asked about project!! So, we decided to do a photo step-by-step tutorial to show just how easy (and fun!) it is.
For the ingredients you will need 1 cup of hot chocolate mix (we used the packaged mix but you could use bulk mix if you're doing several cones), 1/4 cup M&M's, mini Kisses or crushed candy canes, 3/4 cup mini marshmallows. You can add a candy cane to be used as a stirring stick.
Fill your first clear 6"x12" cone bag (available at The Essential Packaging Store) with the hot chocolate mix.
Secure the top of the cone bag with ribbon or a twist tie. Cut off the excess top of the bag, above the twist tie.
Insert this filled cone bag into another clear cone bag. It's best to keep the hot chocolate mix in a separate cone bag so that the mix doesn't go all over the candy and marshmallows - it looks a bit messy!!
Tuck the top of the bag down so you can add the chocolate (or crushed candy canes) on top of the filled cone bag. Layer the mini marshmallows on top of the chocolate.
Using a small length of ribbon or tinsel cord tie the top of the cone bag just above the layer of marshmallows.
Finish off you cone bag with a length of ribbon tied into a simple shoelace bow. Attach the candy cane stirring stick to the bow and you're done!!
These Snowman Soup cone bags are quick and easy to make, plus they make great gifts for teachers, Grandparents, friends and neighbours. For something different, try one of these other ideas below-
try adding some Smarties to the point of your cone bag and filling with caramel corn - yum!
or layer different coloured beans and dried noodles for a bean soup cone bag - makes a fabulous hostess gift!
Hope you've found this Snowman Soup cone bag tutorial helpful - now have fun with this project!!
Anna @ Essential Packaging
www.essentialpackaging.com
Subscribe to:
Posts (Atom)