Friday, March 2, 2018

Party favors using cupcake wrappers and cellophane...


UPDATE

Want to learn more about how to 
creatively use our packaging products?

Take a look at our new blog,

A Beautifully Wrapped Life here


Hi Everyone
this is Cheryl and I have hijacked the blog posting for today. If you follow the Essential Packing Store Blog you might remember this post that Anna did in May about cupcake wrappers. She had all sorts of patterns with yummy cupcakes in them. At the Essential Packaging Store the staff like to use products for things other than what they are intended for and that is what my post is about today.

Cupcake Wrappers are not just for cupcakes. Robin....our most extraordinary and talented gift-wrapping artist.....came up with an idea to fill cupcake wrappers with candy or chocolate. She assembled the cupcake wrapper (it comes flat) and put a sheet of cellophane under it, filled the cupcake wrapper with candy then enclosed the cello around the wrapper and tied it with a nice bow. Now you have a party favor (favour) to use for weddings, baby showers, anniversary parties or any special event. They are really cute and you can coordinate it to your decor and tastes.

Check out the two samples she came up with but the possibilities are endless.


Let us know if you have any other ideas for cupcake wrappers.
Thanks for stopping by today.
Cheryl

Monday, August 14, 2017

It's a Beautifully Wrapped Life!


Welcome to our new blog 
A Beautifully Wrapped Life!


We're excited to share inspiring projects and 
creative ways to use our packaging products! 


Come and join us over at 
and see what it's all about!


Wednesday, November 9, 2016

Create our newest Advent Calendar!

UPDATE

Want to learn more about how to 
make your own advent calendar?

Take a look at our post-

Make Your Own Gift Box Advent Calendar here

It's on our new blog A Beautifully Wrapped Life!


It's about that time when we need to start thinking about the upcoming holidays - they're not as far away as you think!  So, we’ve taken a past project – the Advent Calendar and refreshed it for 2016. Since you’ll need to have the calendar ready to go for December 1st, now is the time to start!!

This year's version is similar to previous years with just a few little tweaks. All the supplies we used (the gift boxes, labels, ribbon, giftwrap and double-sided tape) are available at Essential Packaging (in-store only).


First choose which way you'd like your boxes to open - I happened to chose that mine would have the "doors" open down.  A customer suggested she would prefer to create this with her boxes on their sides so her doors would open just like an actual door, from left to right - good idea!  Our 3”x 3” x 3” giftboxes are the ideal size for any little treasures you may want to give.


To re-create our newest version of the Advent Calendar you’ll need 25 of our 3" x 3" x 3" black giftware boxes and 25 of our Reindeer Labels.  Attach the labels to the lids of the boxes and number them from 1 to 25 (ensuring the labels are all placed properly so the “doors” open the way you’d like).


Assemble the boxes in five rows of five boxes and attached them together with Sookwang tape.  Take a length of giftwrap and fold it into a band and wrap it around the outside edge of the entire Advent Calendar.  Add a bow out of coordinating ribbon to the top.


The advent calendar was fun, quick and easy to make – my son, Matthew looks forward to this treat every year and has really enjoyed opening up his advent calendars over the years.
Interested in great projects, new products and special features?
That's all for now but we'll see you soon!

Anna @ Essential Packaging

Thursday, September 15, 2016

Tissue Paper Sunflowers - An Easy DIY Project!


UPDATE

Want to learn more about how to 
make your own tissue paper sunflowers?

Take a look at our post-

Make Your Own Tissue Paper Sunflowers here

It's on our new blog A Beautifully Wrapped Life!


Take a look at our newest tissue sunflower tutorial on our new blog, A Beautifully Wrapped Life!!

Click here to see the NEW tutorial


Supplies


Most importantly, you need tissue paper!
For our sample, we chose some good autumn colours such as
gold and orange for the petals and brown for the centers.

Prepping Your Pieces


Select the tissue paper you would like to use for your sunflower petals.
We traced and cut through several layers at once to make this step go a little quicker
(we used 10 sheets folded in half to make 20 layers that we then cut through)

Now, download and print the petal templates (here) that we've created for you.
We've made a small and large petal for you so you can make different sized sunflowers.
Cut out the templates and arrange them on your tissue paper sheets.


Then, cut out all your sunflower petals. Yes, cut LOTS!!
You'll need quite a few petals for each sunflower.


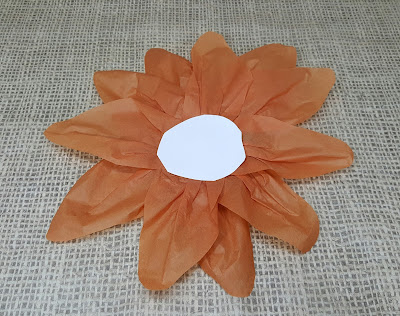
With the brown tissue paper, using 2 sheets, cut your sheets in half.


Take one half of the sheet in your hand and start tucking the edges of the sheet underneath,
while forming a round circle. Remember, it doesn't have to be an exact circle. The photo on
the left is the under side of the formed center while the photo on the right is the smooth top
of the sunflower center.

Assembling Your Sunflower


Flip your brown center so the underside is facing up at you. Take a petal, give it a
little pleat lengthways down the center and attach the end to the brown center using hot
glue or tape (we used double sided tape for our sample) Continue adding
petals all the way around the brown center, overlapping them as you go.
We added between 12-15 petals per sunflower.


Once you've finished adding all your petals, cut a small piece of paper or cardstock
that you can glue to the back to hold it all together. This way, you can tape or
glue your sunflowers more easily and they won't come apart.


Ta-da, you've completed your first  tissue paper sunflower!!
We hope this tutorial has inspired you to make a whole bunch more!!


Interested in great projects, new products and special features?
Sign up for The Essential Packaging Newsletter
Shop online at www.essentialpackaging.com
That's all for now but we'll see you soon!
Anna @ Essential Packaging


Friday, June 10, 2016

Gift Baskets 101 - Step By Step Instructions For Wrapping a Gift Basket!

UPDATED!!

Take a look at our newest giftbasket tutorial on our new blog, 

A Beautifully Wrapped Life!!

Click here to see the new tutorial


Have you ever wanted to put together one of those beautifully wrapped gift baskets but just didn't know how to wrap it or where to even start? It can be overwhelming especially when we really want it to look amazing, right? Well in today's post, we're going to show you, step by step, how easy it can be wrap up a gift basket!

Step #1 - Your Supplies


To create a good gift basket you're going to need some basic supplies:
a gift box with removable lid, clear cello basket bag (instead of the roll wrap),
newsprint packing paper, some tinsel cord, a pull bow and some colored basket shred.

Step #2 -Your Container


For this gift basket, instead of using a boring wicker basket we will be using one of our 2 piece gift boxes that measures 7"x7"x4". These boxes are quite rigid and not only make great gift basket containers but they're also reusable as storage boxes after. You can either place the lid under the box or behind it.

Step #3 - Your Base


For a good base, we use newsprint packing paper. The newsprint is stiff, inexpensive and helps
to fill the bottom of your container so you use less of the colorful basket shred. The packing
paper also helps to keep heavy things (like jars and bottles) in place so they don't get damaged
and prevents them from sinking down to the bottom of the box (you want to see the products!)

Step #4 - Your Filler


 Once you've got your newsprint packing paper in place, sprinkle some colorful basket shred on top.
The color choice is yours but we usually recommend using a complimentary color (that matches
the ribbon or bow) or a neutral color so your products stand out.

Step #5 Your Products


When placing your products in the gift basket, keep in mind a few things:
  • How is your basket going to be viewed? Just from the front or all the way around? In our sample gift basket, we decided to make the basket viewed just from the front, which is why we put the lid at the back of the box. You then want to "layer" products smallest to largest, from front to back (this way, small items can lean against the tall items in the back)
  • If your gift basket is to be viewed all around, you would put your lid under the box with the taller products in the center and the smaller items around the edge.

Step #6 - Your Basket Bag


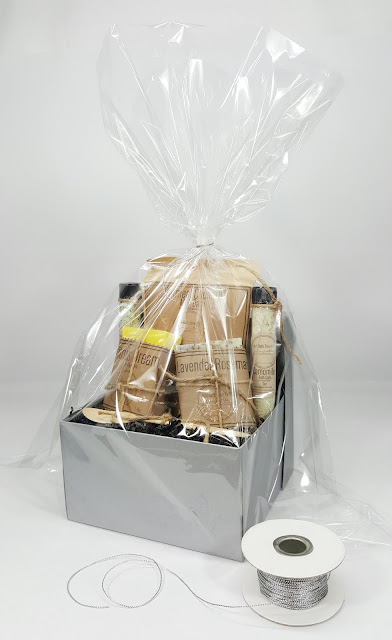
Once you've placed all your products in the box, it's time to put the box into a clear cello basket bag. Though not all baskets or containers will fit into a preformed basket bag, if yours can then use one as they are much easier to use than the traditional cello wrap on a roll. Secure the top of the cello basket bag with a length of tinsel cord. We usually like to tie at the top of your tallest item in the gift basket. This helps keep everything secure inside and the cello wrap looking nice and crisp (not like someone sat on it!!)

Step #7 - Your Corners


 You'll notice in the previous photo in Step #6 that the corners of the basket bag are sticking out on the
sides of the box. You MUST tape those under the box! It's the quickest way to make an average
looking basket look amazing! It also helps keep all those products in their place. The last thing you
want to do, after all this effort, is give a gift basket that looks like it's been rolling around in your car trunk!

Step # 8 - Your Bow


 Ok now you're almost done, you just need a bow for that finishing touch! The bow is an important
part of the overall presentation of the gift basket so it needs to look good. Above, we've shown
an example of a black pull bow (top photo) which is easy to use especially if you're not good
with tying bows. In the bottom photo, we used a custom printed satin ribbon bow, which is hand tied.
This is a bit trickier to do but looks amazing, especially on corporate or special event gift baskets.

So, hopefully these easy to follow steps will inspire you to try making a beautifully wrapped gift basket soon!

Interested in great projects, new products and special features?
Sign up for The Essential Packaging Newsletter
Shop online at www.essentialpackaging.com
That's all for now but we'll see you soon!
Anna @ Essential Packaging

Tuesday, May 31, 2016

4 Ways To Refresh Your Packaging!

UPDATE

Want to learn more about how to 
creatively use our packaging products?

Take a look at our new blog,

A Beautifully Wrapped Life here


A question: Does your packaging reflect your brand? 

Whether you are an artisan in local markets, an online Etsy shop or a brick and mortar retail store, your packaging should say a lot about who and what you are. After your customer has made their purchase, the way you present (or package) that purchase can have a lasting impact on how they felt about their shopping experience.


Remember, as the saying goes, presentation is EVERYTHING!!


Take a moment and look at your packaging. Have you had the same packaging for a while? Is it interesting or creative? Does it tell potential customers what you do or sell? If not then maybe it's time to REFRESH! 


Here are 4 ways you can REFRESH your packaging with CUSTOM BRANDING!


#1 - Custom Branded Ribbon 


Custom branding on ribbon is a great place to start if you're needing a refresh! Ribbon is very versatile so you can tie it on gift or clothing boxes, shopping bag handles, gift card folders and gift baskets. It can make your customer's purchase look "gift wrapped" which adds perceived value. With so many imprint colors, ribbon colors and widths to choose from, custom branding your ribbon is an easy way to dress up your packaging!


#2 - Custom Branded Bags


Custom branded bags...this is the ultimate in presentation! It evokes luxury and sophistication and is a great way to build on your brand's recognition. With so many bag types, colors and quantities, it can be a very affordable packaging option too. Who wouldn't want to walk away with a purchase that looked this good?! Remember, customers walking around with your custom branded bags are basically walking advertisements for you!


 #3 - Custom Branded Labels


Custom branding your labels can be a perfect place to start on your packaging refresh! Labels are very versatile and can be used on virtually anything: bags, boxes, gift card folders, products, tissue paper, gift wrap and tags. If you're not quite ready to take the plunge and have all your packaging custom branded, this could be a good first step. It still gets your name recognized and that's always a good thing!


#4 - Custom Branded Boxes


Custom branded boxes...an easy way to add some luxury to your packaging! We can all picture a blue Tiffany and Co. jewelry box, right? Why is that? Because it's an iconic representation of their brand. Well, borrow a page from them and create your own version! Custom branded boxes can be imprinted with a logo or message, in a variety of colours to suit your purpose. Don't forget to add ribbon for a complete, gift wrapped presentation!


So remember, if you're looking to REFRESH your packaging, consider custom branding!

Would you like more information about custom branding your packaging?
Please contact us at info@essentialpackaging.com and we'll be happy to help you!

Interested in great projects, new products and special features?
Sign up for The Essential Packaging Newsletter
Shop online at www.essentialpackaging.com
That's all for now but we'll see you soon!
Anna @ Essential Packaging

Tuesday, March 1, 2016

3 Surprisingly Easy Easter Projects You Can Make!! (Project #2 The Bunny Wrapper)


UPDATE

Want to learn more about how to 
creatively use our packaging products?

Take a look at our new blog,

A Beautifully Wrapped Life here


With Easter just around the corner, now's a great time to get started on some projects!
We've put together 3 surprisingly easy projects that won't take you long to make. 
You can even recruit some "little hands" to help you!

Project #1 - The BunnyWrapper


The Bunny Wrapper is another really easy Easter project! All you need is a plain natural paper grocery bag (we used a 2lb.size) and of course an apple (or an orange!) With so many children having allergies (and many parents trying to reduce their children's sugar intake), this "healthy treat" is a great alternative.


Lay your bag flat on your table and using a sharp pair of scissors, trim off the sides of the bag.
Then, trim the top of your bag to look like ears, as in the photo above.


Now place your apple in the middle of the bag. Gather the 2 sides up and using a length 
of ribbon, tie a bow just below the ears to secure the bag. That's it! Pretty easy and really 
won't take long to do, even with "little hands" helping you!

We have our samples in the Store if you'd like to come by and see them.
Hopefully we've inspired you to give this Easter project a try! Looking for more ideas?
Take a look at Projects #1 The Bunny Bag and #3 The Glam Bunnies!!

Interested in more great projects, new products and special features?
Sign up for The Essential Packaging Newsletters
Shop online at www.essentialpackaging.com

That's all for now but we'll see you soon!
Anna @ Essential Packaging